


Photo by Nick Fewings on Unsplash
Step-by-Step: Implementing API Versioning in NestJS with Swagger Integration


In the fast-paced world of software development, change is constant. The name software itself attests to this fact. In contrast to hardware, which is less malleable, Software is inherently malleable; it can be modified, updated, or reconfigured with relative ease, hence the soft in the word software.
APIs are vital bridges that connect different software systems, and they usually evolve. It is important to ensure compatibility and smooth transitions for existing clients, or else the 'bridge' will become unusable and software systems will fail to work as expected.
In this article, we will explore several compelling reasons for versioning your REST API, accompanied by a step-by-step demonstration of implementing versioning in NestJS. Additionally, we'll harness Swagger's capabilities to create documentation for your versioned API endpoints.
At the end of this article, we will have learned how to version our API endpoints as in the form /api/v1/resource, /api/v2/resource.
Shall we begin?
If you prefer video content, there is a video tutorial equivalent to this article:
Why Version Your REST APIs?
Versioning your REST APIs is essential for the seamless evolution of your APIs and continuous client compatibility. You will want Backward Compatibility between your APIs and the clients consuming them.
If your API is publicly available for people to consume, Backward Compatibility is even more important. You will want existing clients to continue to work without the changes to your API affecting them.
Versioning also ensures a smooth transition to new features; you can roll out changes gradually to different sets of clients and get those features tested before rolling them out to the rest of the clients. For public APIs, exposing new features in a new version of your API allows clients to transition to the new functionality at their own pace.
Without versioning, every change to the API would impact all clients immediately, and they would be forced to make updates.
Versioning and Swagger Integration in NestJS
In this section, we will be going through a sample project to show how you can create different versions of your REST APIs being developed in NestJS. It is assumed that you know how to use NestJS and have some understanding of the project structure in NestJS.
Project Setup
In order to follow along, clone the repository here on GitHub.
The sample project is a very simple e-commerce-like API. There is no database layer, I use a simple array to store the data, and every CRUD (Create, Read, Update, Delete) operation is performed in memory.
We have 3 modules for product, category and order. They all have similar structures; there are DTOs, a service file, a controller, and then the individual NestJS module files:

The functionality across the 3 modules is very similar; let's look into the order module. This is the content of order.service.ts:
import { Injectable } from '@nestjs/common';
import { CreateOrderDto } from './dto/create-order.dto';

@Injectable()
export class OrderService {
  private orders = [];

  createOrder(createOrderDto: CreateOrderDto) {
    const newOrder = {
      id: Date.now().toString(),
      ...createOrderDto,
    };
    this.orders.push(newOrder);
    return newOrder;
  }
}
As I mentioned earlier, an in-memory array will be used to store data. The orders array will store the orders created via our API. The createOrder method is a very simple one, it receives a payload object createOrderDto constructs a newOrder and then adds the newOrder into the list of orders.
The content of the create-order.dto.ts is:
import { Type } from 'class-transformer';
import {
  ArrayMinSize,
  IsArray,
  IsNumber,
  IsPositive,
  IsString,
  ValidateNested,
} from 'class-validator';

class ProductDto {
  @IsString()
  productId: string;

  @IsNumber()
  quantity: number;
}

export class CreateOrderDto {
  @IsString()
  userId: string;

  @ValidateNested({ each: true })
  @Type(() => ProductDto)
  @IsArray()
  @ArrayMinSize(1)
  products: ProductDto[];

  @IsPositive()
  totalAmount: number;
}
CreateOrderDto defines a userId, an array of products and a number indicating the totalAmount to be paid for the products. We also have a nested dto ProductDto which defines the structure of the products we are expecting from the client.
The controller order.controller.ts creates the endpoint needed and delegates tasks to the service:
import { Controller, Post, Body } from '@nestjs/common';
import { OrderService } from './order.service';
import { CreateOrderDto } from './dto/create-order.dto';

@Controller('orders')
export class OrderController {
  constructor(private readonly orderService: OrderService) {}

  @Post()
  createOrder(@Body() createOrderDto: CreateOrderDto) {
    return this.orderService.createOrder(createOrderDto);
  }
}
You can start the API server by running yarn start:dev and test out the API endpoints with, say, Postman. We will be integrating Swagger from scratch later on in the article. The server starts on port 3030 as defined in main.ts:
import { NestFactory } from '@nestjs/core';
import { AppModule } from './app.module';
import { ValidationPipe } from '@nestjs/common';

async function bootstrap() {
  const app = await NestFactory.create(AppModule);
  app.useGlobalPipes(new ValidationPipe());
  await app.listen(3030);
}
bootstrap();
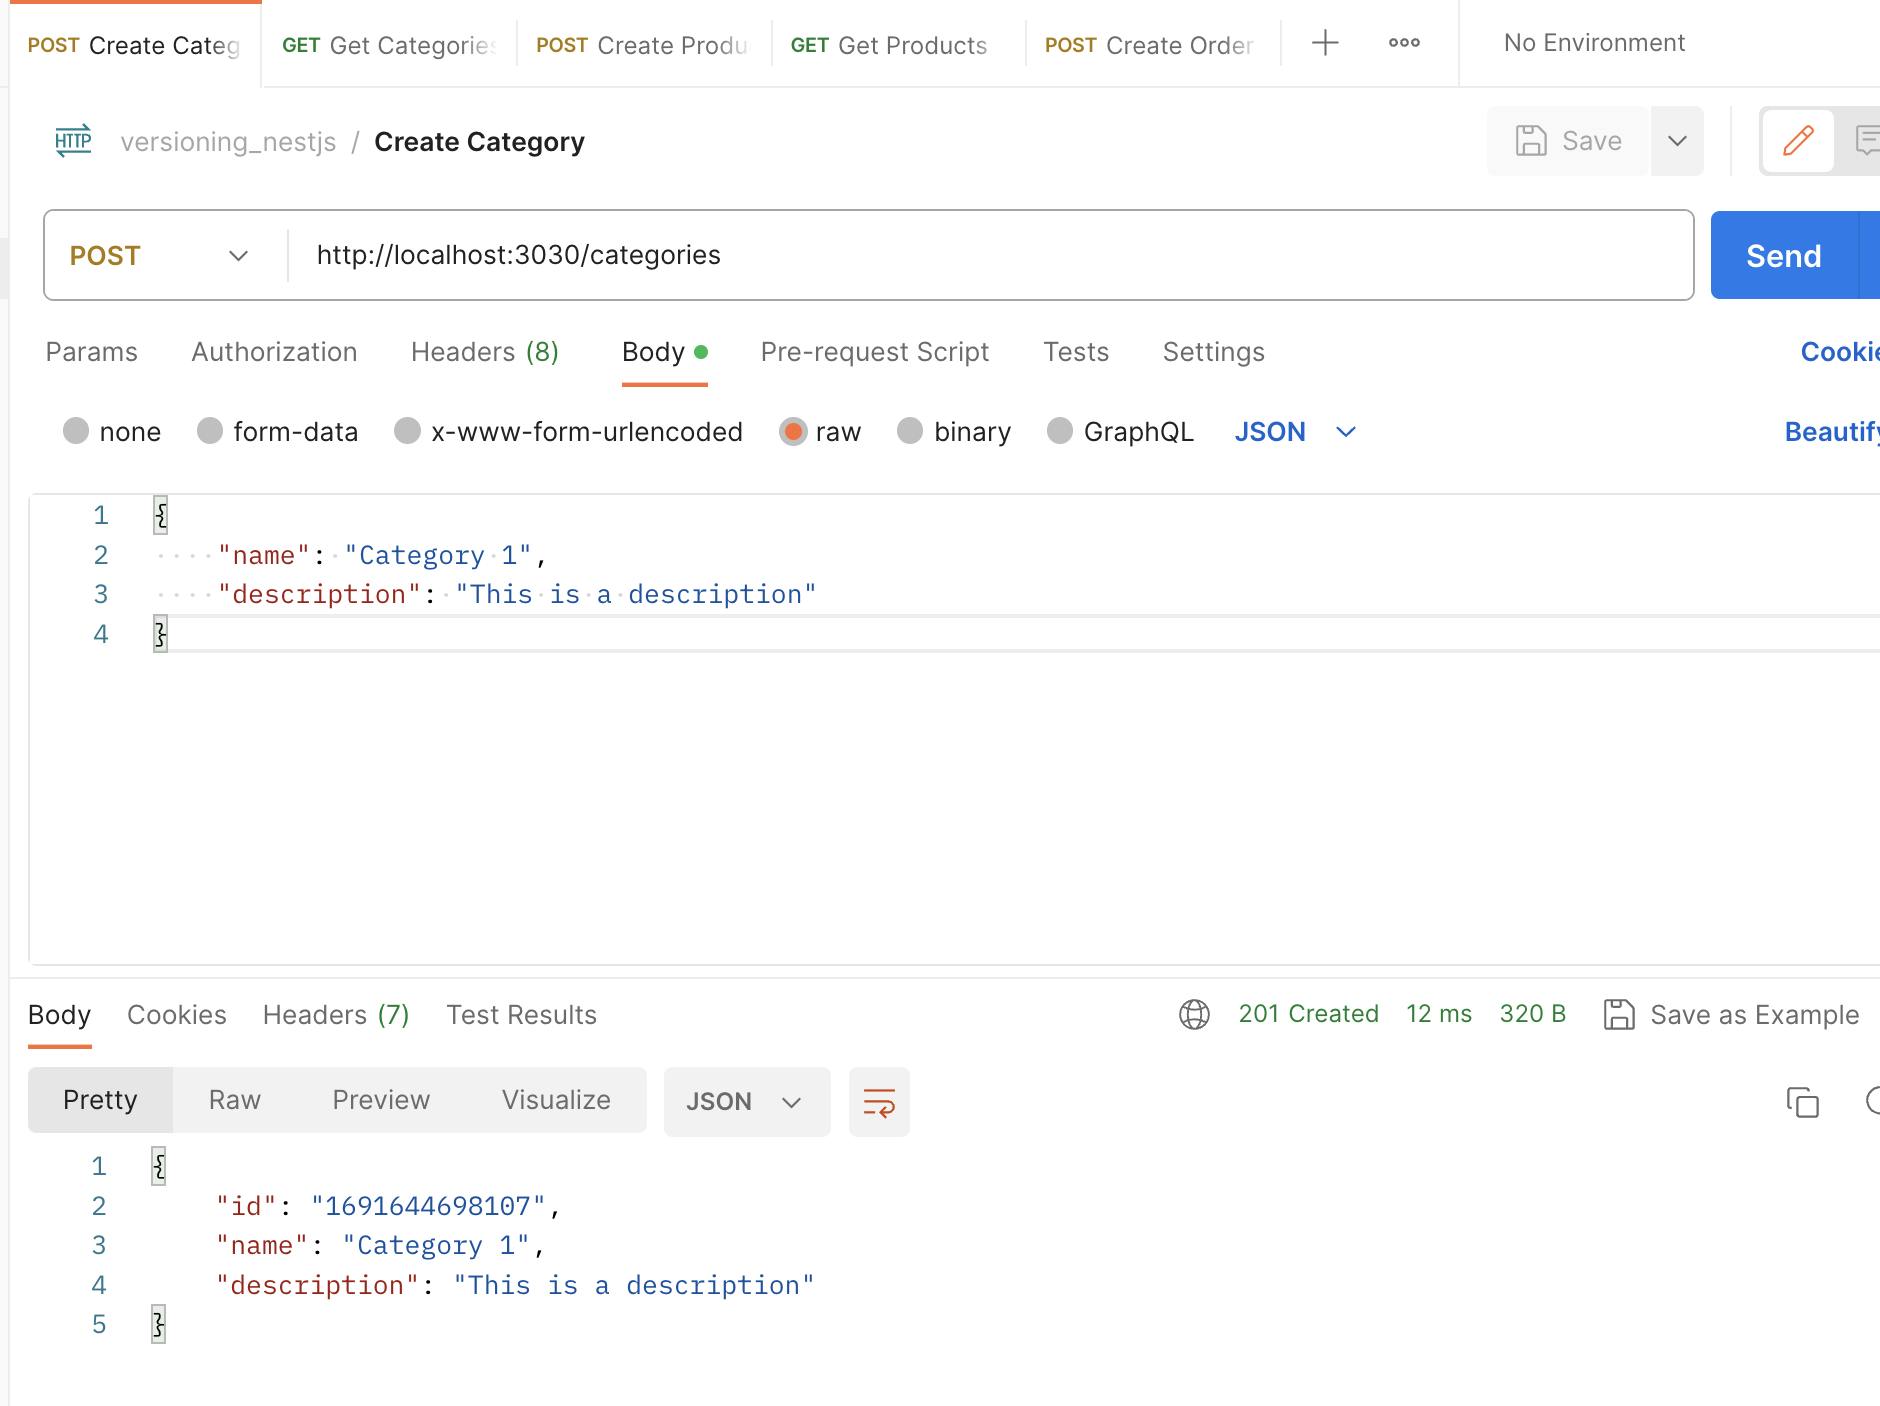
Testing out the create category endpoint:
Swagger Setup
Let's install swagger by running yarn add -D @nestjs/swagger. Then we configure Swagger in the main.ts:
import { NestFactory } from '@nestjs/core';
import { AppModule } from './app.module';
import { SwaggerModule, DocumentBuilder } from '@nestjs/swagger';
import { ValidationPipe } from '@nestjs/common';

async function bootstrap() {
  const app = await NestFactory.create(AppModule);
  app.useGlobalPipes(new ValidationPipe());

  const config = new DocumentBuilder()
    .setTitle('E-Commerce Service')
    .setDescription('The e-commerce API description')
    .setVersion('1.0')
    .addTag('commerce')
    .build();
  const document = SwaggerModule.createDocument(app, config);
  SwaggerModule.setup('api', app, document);

  await app.listen(3030);
}
bootstrap();
We will then annotate the controllers. I will use the product controller as an example. In product.controller.ts, we will import ApiTags from @nestjs/swagger:
import { Controller, Get, Post, Body } from '@nestjs/common';
import { ProductService } from './product.service';
import { CreateProductDto } from './dto/create-product.dto';
import { ApiTags } from '@nestjs/swagger';

@Controller('products')
@ApiTags('products') //
export class ProductController {
 ...
}
We have to do the same in the other controller files. We also want to annotate the DTO files with Swagger so that they show up in the Swagger Documentation.
There are two ways to do that, using Swagger decorators in the DTO files or letting Swagger CLI automatically annotate all the DTO files. We will be going with CLI automation. We have to edit the nest-cli.json file and update it to include the @nestjs/swagger plugin:
{
  "$schema": "https://json.schemastore.org/nest-cli",
  "collection": "@nestjs/schematics",
  "sourceRoot": "src",
  "compilerOptions": {
    "deleteOutDir": true,
    "plugins": ["@nestjs/swagger"]
  }
}
Restart the server and visit localhost:3030/api :

Versioning the API Endpoints
There are different types of versioning that NestJS supports, but we will be going through the URI Versioning as that is the most common.
To enable versioning, we update the main.ts to include app.enableVersioning, we do that before configuring Swagger in the bootstrap function (important!):
...
import { ValidationPipe, VersioningType } from '@nestjs/common';
async function bootstrap() {
  ...

  app.enableVersioning({
    type: VersioningType.URI,
    defaultVersion: '1',
  });

  const config = new DocumentBuilder()
  ...
We defined the type of versioning as URI and we set the defaultVersion as 1. If you check the Swagger documentation, you will notice that the endpoints are now being prefixed with /v1/. You can test out the endpoints.

Adding a Global Prefix to the endpoints
We are going to modify all the endpoints to follow the form /api/v1, we could do this by updating every controller file but that will not scale. Instead, we will use a Global Prefix. First, let us define the prefix; create a new file constants.ts inside of the src/ folder:
constants.ts:
export const API_PREFIX = 'api';
We will update main.ts:
...
import { API_PREFIX } from './constants';

async function bootstrap() {
  ...
  app
    .enableVersioning({
      type: VersioningType.URI,
      defaultVersion: '1',
    })
    .setGlobalPrefix(API_PREFIX); // SETTING GLOBAL PREFIX ON APP

  const config = new DocumentBuilder()
    .setTitle('E-Commerce Service')
    .setDescription('The e-commerce API description')
    .setVersion('1.0')
    .addTag('commerce')
    .build();
  const document = SwaggerModule.createDocument(app, config);
  // UPDATING SWAGGER TO USER PREFIX
  SwaggerModule.setup(`${API_PREFIX}/:version/docs`, app, document);

  await app.listen(3030);
}
bootstrap();
We called the setGlobalPrefix with the prefix to set is across all endpoints. We also update the Swagger documentation endpoint. Restart the server and the docs will now be available at http://localhost:3030/api/v1/docs
The Swagger documentation now includes the api prefix and the version, let us test it out by creating a new product from Swagger:

Great.
Creating Different Versions of Route/Controllers
Let's say there is a new requirement with regards to Order creation that requires a breaking change, and a lot of clients are already consuming the current create order endpoint. So you will want to roll it out gradually to clients, and you have decided to have a v2 of the create order endpoint.
Let's add the new logic for creating orders in the order.service.ts:
...
import { CreateOrderDto } from './dto/create-order.dto';
@Injectable()
export class OrderService {
  private orders = [];

  createOrder(createOrderDto: CreateOrderDto) {
    const newOrder = {
      id: Date.now().toString(),
      ...createOrderDto,
    };
    this.orders.push(newOrder);
    return newOrder;
  }

  createOrderV2(createOrderDto: CreateOrderDtoV2) {
    console.log('This is version 2');
    // Let us assume the logic in this method is a breaking change
    const newOrder = {
      id: Date.now().toString(),
      ...createOrderDto,
    };
    this.orders.push(newOrder);
    return newOrder;
  }
}
Open create-order.dto.ts and update it to include CreateOrderDtoV2 :
....
export class CreateOrderDto {
 // remains the same as before
 ....
}

export class CreateOrderDtoV2 {
  @IsString()
  userId: string;

  @ValidateNested({ each: true })
  @Type(() => ProductDto)
  @IsArray()
  @ArrayMinSize(1)
  products: ProductDto[];

  @IsPositive()
  totalAmount: number;

  @IsString()
  tag: string;
}
We have introduced a new required field (tag) into the DTO.
Then we update order.controller.ts:
...
@Controller('orders')
@ApiTags('orders')
export class OrderController {
  constructor(private readonly orderService: OrderService) {}

  @Post()
  createOrder(@Body() createOrderDto: CreateOrderDto) {
    return this.orderService.createOrder(createOrderDto);
  }

  @Post()
  @Version('2')
  createOrderV2(@Body() createOrderDto: CreateOrderDtoV2) {
    return this.orderService.createOrderV2(createOrderDto);
  }
}
We annotated the new route with @Version('2') , this will result in the route being available at api/v2/orders. Check the Swagger documentation:
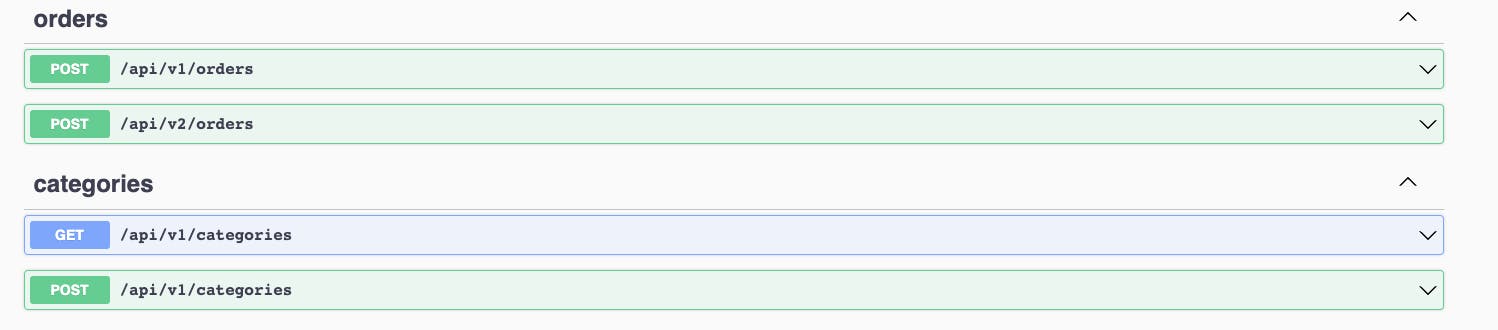
Fantabulous.
We have added a new version at the Route Level. We can also version at the Controller Level. Let us do that with the Product controller as an example.
We create a new file inside of src/product, we name the file product-v2.controller.ts. This will be the content of the file:
import { Controller, Get, Post, Body } from '@nestjs/common';
import { ProductService } from '../product.service';
import { CreateProductDto } from '../dto/create-product.dto';
import { ApiTags } from '@nestjs/swagger';

@Controller({
  path: 'products',
  version: '2',
})
@ApiTags('products')
export class ProductControllerV2 {
  constructor(private readonly productService: ProductService) {}

  @Get()
  getAllProducts() {
    return this.productService.getAllProducts();
  }

  @Post()
  createProduct(@Body() createProductDto: CreateProductDto) {
    return this.productService.createProduct(createProductDto);
  }
}
We will have to include the new controller in product.module.ts:
import { Module } from '@nestjs/common';
import { ProductService } from './product.service';
import { ProductController } from './product.controller';
import { ProductControllerV2 } from './product.controller-v2';

@Module({
  providers: [ProductService],
  controllers: [ProductController, ProductControllerV2],
})
export class ProductModule {}
Checking the Swagger documentation, we can see the v2 of the product endpoints:

Great. Now we have api/v1 and api/v2 of the product routes.
Note: As of the time of writing this article, NestJS has no way to filter out different versions of the route in the Swagger documentation. There is an open issue on the matter. So for now, every version of the API is displayed on the swagger documentation.
We can also decide to change the code structure of the files in the project to include the different versions of the controller.

Conclusion
In this article, we went through some reasons why versioning your API is a long-term strategy that bridges the evolution of your APIs and stability. We also walked through a step-by-step project example in NestJS that shows how we can implement versioning with Swagger documentation integration.
Versioning isn't just about code; it's a commitment to adaptability and user-centricity. By integrating versioning and good documentation, you've empowered your API to evolve gracefully while providing clear navigation for users.
As you embark on your coding endeavors, remember that versioning isn't merely a technical tool; it's your compass toward a future where change isn't daunting but an opportunity to embrace progress while preserving what works.
May the force be with you. Happy coding.