


In the fast-paced world of modern web development, crafting robust, scalable, and maintainable applications is of utmost importance. NestJS, a progressive Node.js framework, has emerged and proven itself as a powerful tool that equips developers with the means to achieve just that.
The core of Nest's strength is its architecture, which is meticulously designed to harness the power of TypeScript and bring a new level of structure and organization to Node.js server-side applications.
In this series (or Crash Course), we'll embark on a journey through the foundational elements of the NestJS Architecture. This guide aims to provide newcomers with an essential understanding of Nest, offering insights gleaned from over 3+ years of hands-on experience.
While I won't cover every intricate detail of Nest, my focus will be on the core building blocks.
Assumptions Made:
I will assume that you have some knowledge of JavaScript, TypeScript, and Node.js. I also assume that you know how to set up a Node.js environment if you want to follow along (highly recommended). And that you can run commands on the command line and install packages with npm or yarn.
If you also want to explore NestJS, you should continue reading. I try to explain the concepts in the simplest way I can :)
The NestJS Architecture
NestJS addresses a key issue in Node.js development: the absence of a structured architecture. Express, the most popular web framework for Node.js applications, prides itself on being "A fast, unopinionated, minimalist web framework."
This has its benefits, like giving programmers the freedom to choose their architecture and how they structure their code. However, the architectural void can also result in convoluted maintenance, scalability challenges, and code that's difficult to decipher.
Borrowing heavily from Angular's architecture, NestJS offers a path out of the architectural wilderness. It empowers developers to craft applications with a solid foundation, enabling scalability, maintainability, and code that's not just written but orchestrated. NestJS offers consistency in code structure, which makes it easier to onboard new developers and quickly grasp the project's layout and logic.
At the core of the NestJS architecture is its Dependency Injection system. Let's dive into that.
The Magic of NestJS's Dependency Injection System
In Software Development, dependencies are akin to ingredients in a recipe. Just as a chef relies on various ingredients to create a delicious dish, developers use dependencies to create functional and feature-rich software. Dependencies are the building blocks that an application relies on—external resources, services, or classes that help fulfil specific functions.
Let's look at an example of a dependency relationship at the class level. We define a class as follows:
export class MapService {}
And another class:
export class PathFinder {
    private mapService;
    constructor() {
        this.mapService = new MapService()
    }
}
In this example, the PathFinder class depends on the MapService. At the time of the creation of an instance of the PathFinder class, it must be able to find the MapService. Hence, both services are tightly coupled together.
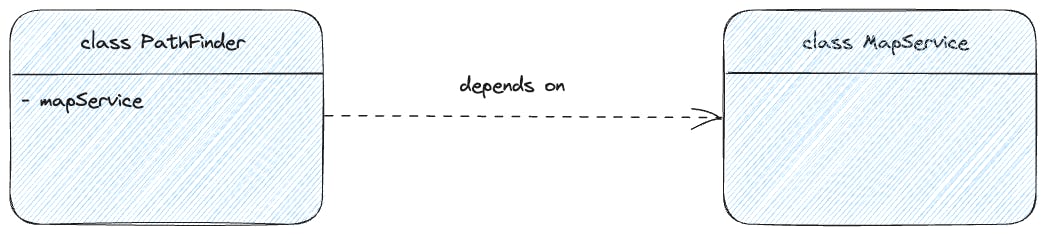
As the complexity of applications grows, there will be many more dependency relationships among classes and modules, and managing these relationships can become tedious.
With Nest's Dependency Injection (DI) system, NestJS automatically provides the necessary dependencies to different parts of your application, reducing tight coupling and making your code more modular and maintainable.
Dependency Inversion is an implementation of a technique known as inversion of control (IoC), where you give up "control" of the instantiation of dependencies to the NestJS IoC container, which is the NestJS runtime system, instead of doing it imperatively in code as we did in the PathFinder constructor.
Constructor-based Injection in NestJS
With the DI, classes in Nest don't need to worry about how to find and instantiate their dependencies. They just have to announce that they need a dependency, and the NestJS IoC container will inject the dependencies into them. Classes 'announce' that they need a dependency by listing it as part of the parameters of their constructor. Let's rewrite the PathFinder class:
export class PathFinder {
    constructor(private mapService: MapService) {}
}
PathFinder now declares that it needs the MapService in its constructor, it is now the job of the NestJS IoC container to provide an instance of the MapService when it is creating an instance of the PathFinder class. For the IoC container to be able to inject an instance of MapService properly, the MapService must be defined as a provider. To do that in NestJS, you annotate the class definition with @Injectable like this:
import { Injectable } from '@nestjs/common';

@Injectable()
export class MapService {
  ...
}
Nest and Decorators
In TypeScript, the syntax @Injectable is how we use Decorators. They are like labels that provide extra instructions to the compiler; they are annotations that enhance the behaviour of classes, methods, properties, or parameters.
NestJS uses decorators heavily to enable its features, for example @Injectable decorator for decorating classes to signal to Nest IoC that the classes can be injected as dependencies. The @Module decorator that defines a Nest module (we will learn about them shortly) and its components.
Setting up NestJS
The Nest CLI is a very important tool when working with NestJS. It has commands that will help you quickly bootstrap a Nest project and also generate the different components and building blocks Nest provides.
It is highly encouraged that you code along as you go through the rest of the article. First, you need to set up a new Nest project by installing the Nest CLI. To do that, run the following commands one after the other:
# install nest cli with npm
npm i -g @nestjs/cli

# scaffold a nest project with the nest CLI
nest new nest_architecture # nest_architecture is name of the project
You can also set up a new Nest project with npx if you don't want to install the Nest CLI:
npx @nestjs/cli new nest_architecture
But this means that when we run any Nest CLI command like nest generate module..., you have to do this instead npx @nestjs/cli generate module...
Note: The project we will be building throughout this series is merely for illustration purposes and to illuminate the Nest concepts we will be going through.
NestJS Modules: Crafting Code Harmony Through Organization
Nest's modules can be likened to a train divided into compartments. Each compartment (module) holds specific passengers or cargo (functionality), ensuring efficient organization and separation of responsibilities.
NestJS module-based architecture offers a structured approach to code organization. Each module is meant to act as a self-contained unit, encapsulating related functionality. By compartmentalizing functionalities into modules, NestJS not only simplifies code management but also fuels collaboration, scalability, and reusability.
A module in NestJS is a class that is annotated with a @Module decorator. Every Nest project has at least one Module. When you create a Nest project with the Nest CLI, you get a root module named AppModule by default.
You can find the root module in the app.module.ts file inside of the src from the project we scaffolded with the Nest CLI above:
import { Module } from '@nestjs/common';
import { AppController } from './app.controller';
import { AppService } from './app.service';

@Module({
  imports: [], // can be omitted if empty
  controllers: [AppController],
  providers: [AppService],
  exports: [] // can be omitted if empty
})
export class AppModule {}
The @Module decorator takes a single object with properties that are used to describe the module. Let's go through each of the properties:
imports
This property allows you to import other modules, enabling seamless integration of external functionality and services. When you import other modules, all of the functionalities exposed by those modules become accessible within the current module. This fosters modular design and reusability.
To illustrate using imports, let's generate new modules with the Nest CLI by running the following one after the other :
nest generate module user

nest generate module orders

nest generate module chat
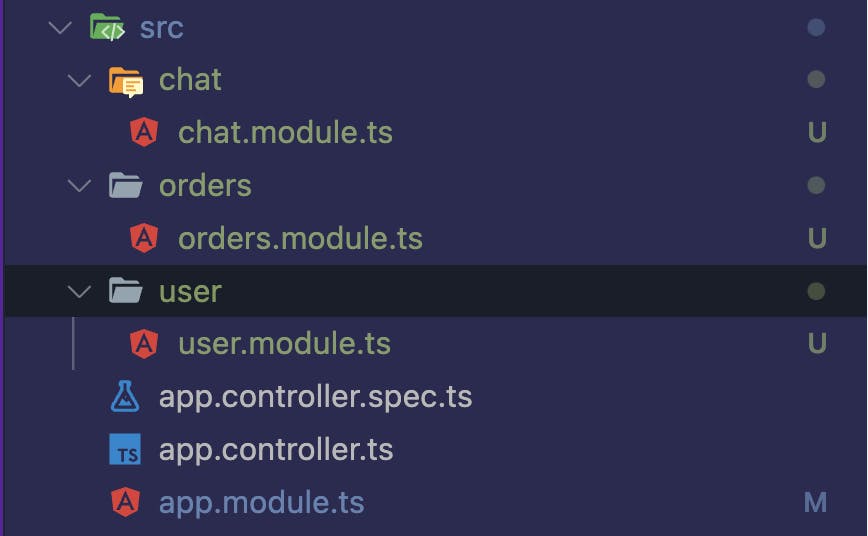
These commands will create new folders with the names of the modules provided: user, orders and chat. Each of these folders will have a .module.ts file:
If you check the app.module.ts file now, you will see that it has been updated to include the new modules:
...
@Module({
  imports: [UserModule, OrdersModule, ChatModule],
  controllers: [AppController],
  providers: [AppService],
  exports: []
})
export class AppModule {}
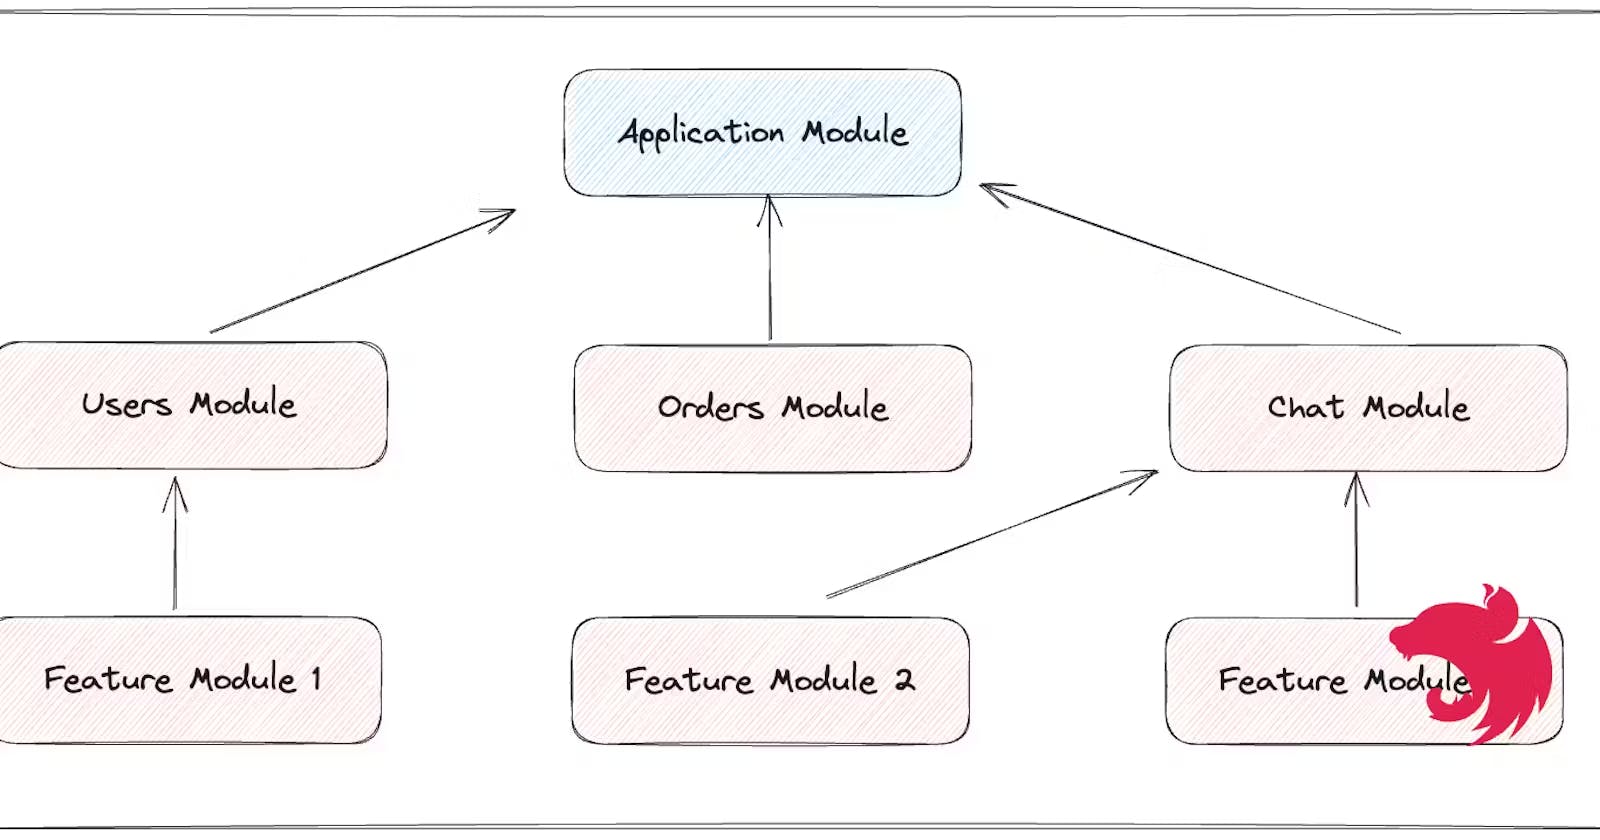
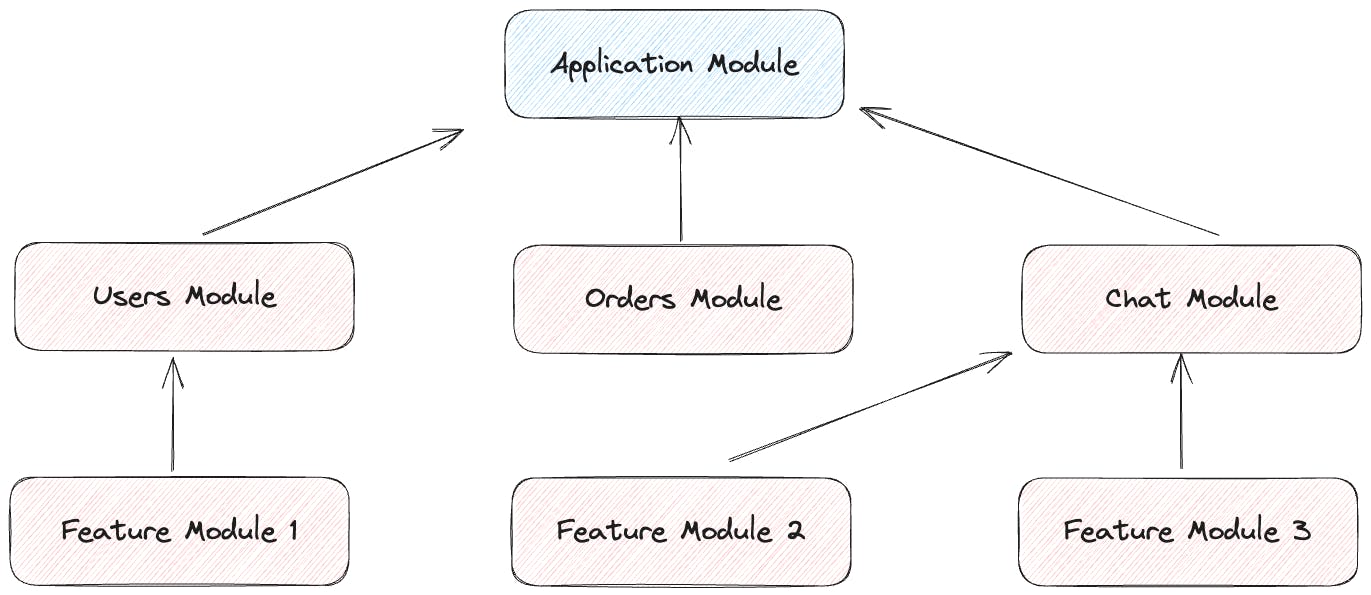
Internally, linked modules form a graph data structure, and Nest knows how to resolve their relationship. A sample representation of the graph structure is represented below based on the current modules we have (I also added some fictitious feature modules as an illustration):
exports
The exports property holds the key to sharing the components of a module with other modules. It is like a sort of 'public API' for the module. The components listed in the exports property of a module are accessible to other modules that import the current module. You must explicitly specify the components you want to export in a module if you want to use those components in other modules.
controllers
The controllers property defines the routes and endpoints for handling incoming requests. By listing controllers here, you specify which routes are associated with the current module.
We will be looking into controllers later in the article, but just know that each controller encapsulates related request-handling logic. This promotes a clear separation of concerns.
providers
As explained with the MapService provider earlier, providers can be injected as dependencies. In the providers property of the module, you give instructions to the Nest's Dependency Injection system on how it can obtain a value for a dependency.
When any Provider is listed in this array, it is said to be registered with Nest. This helps the DI know how to find these providers when they are requested by other objects within the Nest application.
Conclusion
In the first article in this series, we went through the 'why' of NestJS, its Dependency Injection system, and how it uses module-based architecture to organize code. We also talked about the different properties of the @Module() decorator and what they do.
In the next post, we will be looking into Nest Providers a little closer. We will also learn about Nest Controllers and how they help us handle incoming user requests.
Happy Coding :)